
WHY DOES MY WALL BUBBLE AFTER RAIN? CAUSES AND SOLUTIONS
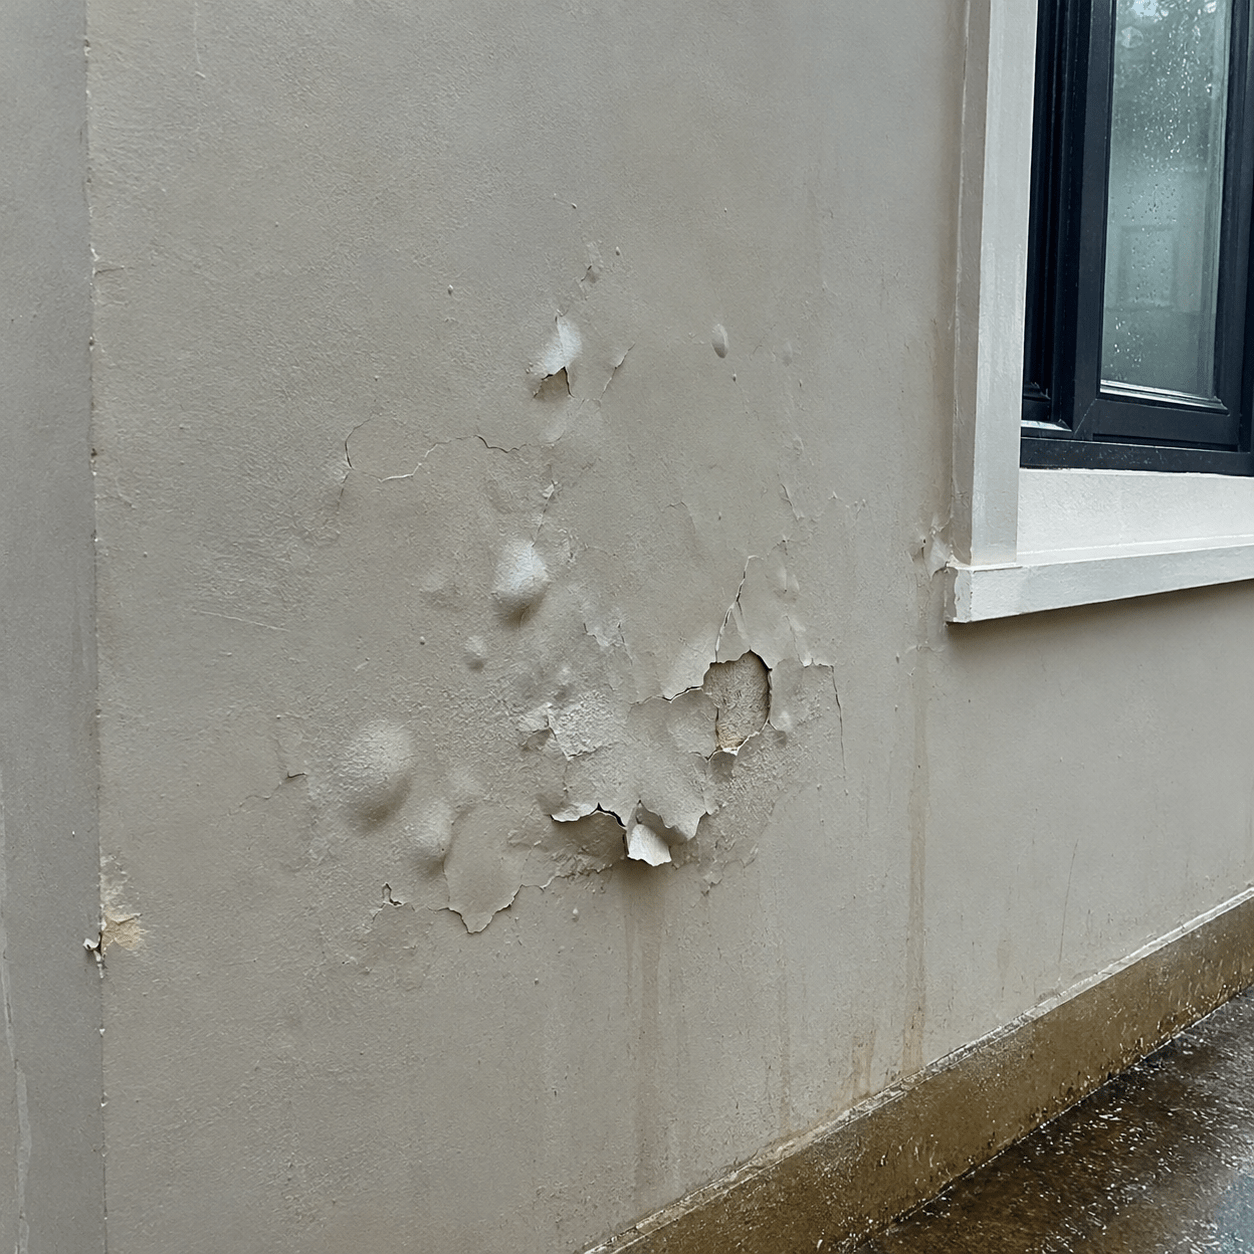
Have you ever painted your house, admired the smooth finish, and felt satisfied with the result, only to discover bubbles on the wall after a heavy rainfall?
At first, it may be a small blister. A few days later, the paint begins to peel, leaving your once beautiful wall looking damaged and untidy.
Naturally, you may begin to question the quality of the paint or the painter who handled the job.
But what if the paint is not the real problem?
When paint bubbles after rain, moisture is often one of the main causes. Water can penetrate the wall, become trapped beneath the coating, or weaken the bond between the paint and the surface. Unless the underlying problem is identified, repainting may only provide a temporary solution.
In this article, Merlux Painting explains why walls bubble after rain, how to identify the possible causes, and what you can do to prevent the problem from returning.
WHAT CAUSES WALLS TO BUBBLE AFTER RAIN?
Paint bubbling, also called blistering, occurs when sections of a painted surface lose adhesion and form raised pockets beneath the coating.
Although bubbling can occur for several reasons, rain-related bubbling often points to a moisture problem.
Here are the most common causes.
1. WATER PENETRATION THROUGH EXTERIOR WALLS
Exterior walls are constantly exposed to rain, sunlight, and changing weather conditions. When the wall coating deteriorates or the wall contains cracks, water may penetrate the surface.
Some walls also absorb moisture because the plaster or masonry is porous and lacks adequate protection against rainwater.
As moisture moves through the wall, it can weaken the bond between the paint and the underlying surface. This may cause the paint to blister, peel, or separate from the wall.
This problem is particularly worth investigating on walls exposed to heavy rainfall or persistent wind-driven rain.
How to identify it: Look for bubbling on the exterior wall, damp patches, cracks, peeling paint, or similar damage on the opposite side of the same wall.
2. MOISTURE TRAPPED BENEATH THE PAINT
A wall may appear dry on the surface while still containing moisture deeper inside.
If paint is applied before plaster, screeding, or other cement-based materials have dried sufficiently, moisture can become trapped beneath the coating.
Water entering through the exterior wall can create a similar problem.
As conditions change, the trapped moisture may contribute to blistering and loss of adhesion.
Applying another coat of paint without allowing the wall to dry properly can make the problem worse.
How to prevent it: Allow newly plastered or repaired surfaces to dry adequately before painting. Where moisture damage has occurred, establish the source and confirm that the wall is sufficiently dry before applying a new coating.
3. CRACKS IN THE WALL OR DAMAGED SEALANT
Sometimes, the problem begins with a small opening that appears harmless.
Cracks in exterior walls, gaps around windows, poorly sealed joints, and defective connections between building elements can allow rainwater to enter.
Once water gets behind the painted surface, the damage may spread beyond the original entry point.
This explains why a homeowner may notice bubbling several inches away from the actual leak.
What to do: Inspect cracks, window and door joints, parapets, and other areas exposed to rain. Repair the defects using suitable materials for the location and type of crack.
If cracks are wide, growing, or recurring, have them assessed by a qualified building professional before carrying out cosmetic repairs.
4. LEAKS FROM THE ROOF OR UPPER PARTS OF THE BUILDING
Not every rain-related paint problem originates in the wall itself.
Water may enter through a defective roof, damaged flashing, leaking gutters, parapet defects, or poorly sealed roof-wall junctions.
The water can travel through building materials before appearing as a damp patch or bubbling paint inside the house.
This is why repainting an affected interior wall without checking the roof and surrounding structure may not solve the problem.
How to identify it: Pay attention to bubbling near ceilings, the upper corners of rooms, window heads, and walls directly below roof edges.
These signs do not prove the exact source, but they indicate where further inspection may be necessary.
5. POOR SURFACE PREPARATION
The condition of the surface before painting plays a major role in the durability of the finish.
Painting over dust, loose paint, chalky surfaces, weak plaster, or contaminated walls can prevent proper adhesion.
When moisture enters the picture, an already weak paint bond may fail more quickly.
Even quality paint cannot compensate for a poorly prepared surface.
The correct approach: Remove loose and blistered paint, clean the surface appropriately, repair damaged areas, and use a compatible primer where the coating system requires one.
However, surface preparation should begin only after the moisture problem has been investigated and addressed.
6. AN UNSUITABLE PAINT OR COATING SYSTEM
Different surfaces and environments require different coating systems.
A product suitable for a dry interior wall may not provide the performance required for an exterior wall exposed to heavy rainfall.
Likewise, applying paint to a damp surface or using incompatible products can contribute to coating failure.
The solution is not simply to buy the most expensive paint available. The product must be suitable for the surface, exposure conditions, and existing coating system.
Always follow the manufacturer's preparation, application, and drying instructions.
HOW TO FIX WALLS THAT BUBBLE AFTER RAIN
If your wall is already bubbling, resist the temptation to scrape it immediately and apply fresh paint.
A lasting repair requires more than making the damaged area look smooth again.
Follow these steps.
STEP 1: IDENTIFY THE SOURCE OF THE MOISTURE
Begin by examining the affected wall and the surrounding areas.
Check for cracks, leaking pipes, damaged roof sections, defective window joints, deteriorated exterior coatings, and other possible sources of water entry.
If the wall is damp after every rainfall, investigate the exterior before deciding how to repair the interior.
Where the cause is unclear, a qualified building professional can help assess the problem.
STEP 2: STOP THE WATER FROM ENTERING
Repair the source of the moisture before repainting.
Depending on the cause, this may involve repairing roof defects, sealing suitable joints, correcting drainage problems, repairing cracks, or improving the exterior wall protection.
The appropriate solution depends on how water is entering the building.
Simply applying waterproof paint over a wall with an unresolved leak may not solve the problem.
STEP 3: ALLOW THE WALL TO DRY PROPERLY
Once the water source has been addressed, allow the affected area to dry.
The time required depends on the depth of moisture penetration, wall construction, weather conditions, and ventilation.
A wall that feels dry to the touch may still contain moisture beneath the surface.
Where necessary, use a suitable moisture meter or seek professional assessment before proceeding.
STEP 4: REMOVE BLISTERED AND LOOSE PAINT
After addressing the moisture source and allowing the wall to dry sufficiently, scrape away paint that has lost adhesion.
Continue until you reach a stable surface.
If the plaster, screed, or skim coat is also weak or deteriorated, the damaged material may need to be removed and repaired.
Take appropriate precautions when scraping old coatings, particularly if their composition is unknown.
STEP 5: REPAIR AND PREPARE THE SURFACE
Fill suitable cracks and repair damaged areas using materials compatible with the wall and its exposure conditions.
Allow repairs to cure and dry according to the manufacturer's instructions.
Remove dust and other contaminants before applying the next coating.
Where required, use a compatible primer or sealer selected for the actual condition of the surface.
Remember that a primer is not a substitute for repairing an active water leak.
STEP 6: APPLY A SUITABLE PAINT SYSTEM
Once the wall is sound, clean, and sufficiently dry, apply a coating system appropriate for the location.
Exterior walls exposed to rain may require a suitable weather-resistant coating, while interior walls need products designed for interior conditions.
Follow the manufacturer's instructions for coverage, application, drying, and recoating.
Correct preparation and moisture control are essential for achieving a durable finish.
HOW TO PREVENT PAINT FROM BUBBLING AFTER RAIN
Preventing paint failure starts before the first coat is applied.
Here are practical steps homeowners can take to protect their walls.
Inspect exterior walls regularly. Look for cracks, peeling coatings, deteriorated joints, and areas where rainwater may enter.
Repair building defects promptly. Small cracks, leaking gutters, and defective window seals should not be ignored.
Allow plaster and screed to dry properly. Painting too early can compromise the coating system.
Use products suitable for the surface. Choose coatings based on the wall condition, exposure, and manufacturer's recommendations.
Prepare surfaces correctly. Remove loose material, clean the wall, and repair defects before painting.
Pay attention to drainage. Ensure that gutters, downpipes, and drainage channels direct water away from vulnerable parts of the building.
Do not rush repainting after water damage. Address the cause first, then allow sufficient drying time before beginning repairs.
These steps can reduce the risk of recurring paint failure and help protect the appearance of your property.
IS BUBBLING PAINT A SIGN OF A SERIOUS PROBLEM?
Not every paint blister indicates a major structural defect. Sometimes, the problem is limited to the coating or the immediate surface beneath it.
However, recurring bubbling, persistent dampness, crumbling plaster, widespread peeling, or visible salt deposits may indicate a deeper moisture problem.
Pay particular attention to damage that returns after repairs or spreads across several areas of the building.
If the wall remains persistently wet, the damage is extensive, or cracks appear to be worsening, seek a qualified professional assessment.
Where mould is present, address the moisture source and clean the affected area safely. Extensive mould growth or repeated dampness may require specialist assistance.
The important thing is not to mistake a visible symptom for the underlying cause.
SHOULD YOU REPAINT THE WALL OR CHANGE THE PAINT?
This depends on what caused the bubbling in the first place.
If the original coating failed because of poor surface preparation, correcting the preparation process may be sufficient.
If the wall was painted while damp, it may need adequate drying and a suitable replacement coating system.
If rainwater is penetrating the building, the water entry point must be addressed before repainting.
Changing to a more expensive paint without correcting the underlying problem may lead to the same result.
The right repair begins with identifying why the previous finish failed.
That is why proper inspection, preparation, and product selection matter just as much as the final coat of paint.
FINAL THOUGHTS: DO NOT LET THE NEXT RAIN EXPOSE THE SAME PROBLEM
A freshly painted wall should do more than look beautiful on the day the job is completed. The coating system must be appropriate for the surface, properly applied, and protected from preventable moisture problems.
When paint begins to bubble after rain, do not rush to cover it up.
Find out where the water is coming from. Correct the underlying defect, allow the wall to dry, and prepare the surface properly before repainting.
At Merlux Painting, we believe good painting work starts with understanding the surface and choosing the right approach for the job.
Because Do it once, Do it right means paying attention to the details that help a finish last.
Are you experiencing bubbling or peeling paint after rainfall? Contact Merlux Painting for professional painting guidance and solutions for your property.